Getting started
Note: This section is dedicated to system administrators.
The system can generate enhanced captions for both images and documents. Image captions are typically brief since they describe only one image, whereas document captions can be more extensive, as each page or slide is described (with a maximum of 50 pages).
Before enabling visibility for these captions, consider whether they should be shown to DAM users. Users don't need to see the captions to benefit from the improved searchability they provide. Document captions, in particular, can take up significant screen space and may not be read by users, raising questions about their value when displayed. On the other hand, users might find it helpful to view image captions.
In this getting started section, we will configure the system to make image captions visible to users on the content item, while document captions will remain hidden. This will give you an opportunity to experience both approaches and understand their impact on user experience.
Before we proceed, please ensure that your company holds an AI Elite license, as enhanced captioning is included with this license.
Activating enhanced captioning on image content.
Follow these steps:
- Create a field to display the enhanced captions on your content.
- Configure the field visibility in DAM UI
- Set up a rule to automatically generate the enhanced captions.
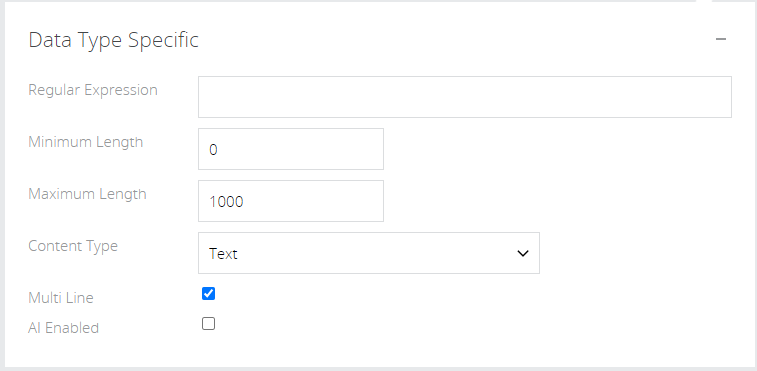
Step 1: Create a text field to visualize the enhanced captions in the DAM
You can create a new field or reuse an existing one that you previously used for AI-based descriptions from Microsoft Cognitive Services (legacy only).
Make sure the field is a single-language, multi-line text field. The enhanced captions should typically be 3 to 5 sentences long, which usually amounts to 250-500 characters. To accommodate this, it's recommended to set the maximum length of the field to 1,000 characters.
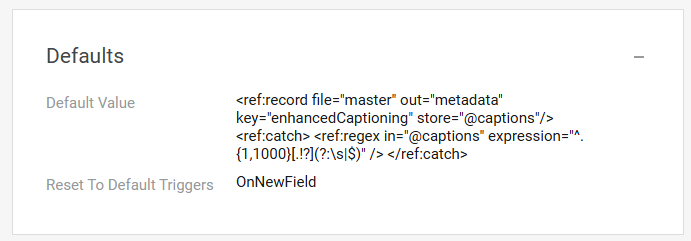
To make the captions visible in the field, configure the following reference code to the default value (this will extract up to 1000 characters of captions into a field, ending with a full sentence):
<ref:record file="master" out="metadata" key="enhancedCaptioning" store="@captions"/>
<ref:catch>
<ref:regex in="@captions" expression="^.{1,1000}[.!?](?:\s|$)" />
</ref:catch>
Use the "Reset to Default" triggers, 'On New Field'.
Step 2: Make the field available in DAM UI
1. Configure the fields on the content types where they are applicable
Administration> Content Administration > Content types configuration
Select the content type and add the field you just configured.
2. Add the field in the UI of the content types where the enhanced captions may appear
Administration> Content Administration > Field definitions
Find the content type(s) you want to add the enhanced captions field to.
Copy and paste this JSON into the configuration of the details view inside the panel (container) you want to see the fields:
{
"type": "field",
"size": "xl",
"name": "Enhanced Captions"
}
Exchange "Enhanced Captions" with the field name you used. Make sure you place a comma before or after as needed to separate it from the other fields in the configuration.
If you don't want the field to be full width in your container, change the 'xl' size to 'lg' or 'md' ('sm' or 'xs' will not be appropriate for the multi-line text field). You can open an item of this content type, refresh the view, and enter edit mode to see how the layout will work.
If you want to display the enhanced captions in the Preview side panel, you can add the appropriate JSON configuration to enable that.
Note
While enhanced captions on images may feel intuitive for content consumers, applying them to multi-page documents may not. The primary value of enhanced captions on documents is to improve discoverability, rather than being displayed to users. It's important to note that the enhanced captions do not need to be mapped in a field or made visible in the UI for this information to remain searchable. Once the rule for generating captions has been executed, the captions will be available for search, even if they haven’t been mapped to a specific field or made visible on a content item.
Step 3: Configure the rule to generate the enhanced captions.
Enhanced captions are generated through a background process that you can activate either rule-based or via a maintenance job. Maintenance jobs are useful for applying enhanced captions to existing or legacy content., but for newly ingested content it is recommended to use a rule-based approach.
For new uploads, enhanced captions should be generated only after the asset has been ingested and a preview has been created. This ensures captioning is based on the visual representation of the asset.
Enhanced captions do not strictly need to be regenerated for every new version of an asset; however, if the visual content of an image or document changes significantly between versions, captions should be regenerated to accurately reflect the latest version and maintain effective searchability.
By default, configuring a rule with the condition “Master File preview created or changed” will ensure a preview has been created and cause enhanced captions to be regenerated on every version upload, since each new version produces a new preview. To prevent captions from being regenerated unnecessarily, an additional condition must be added to the rule to check whether the caption field is empty.
Ensure your rule includes at least two key conditions:
1. Content Identification: Specify which content or content types need captions, focusing on image and/or document content types.
2. Master Preview Availability: Trigger when content has a master file preview created or changed to ensure the preview is available before generating captions. This will also help limit it to new changes vs all existing content, if you wanted to generate on existing content then simply checking the master preview exists would suffice.
⚠ Note: The Enhanced Captions will run whenever the conditions of the rule are met, even if already populated so it is important to have the conditions consider a new file being added or if the field is empty, for example, to help prevent unnecessary runs.
Set the action to generate the enhanced caption:
Add the action "Extract information with Aprimo Image Analysis" to your rule to invoke the enhanced caption generation.
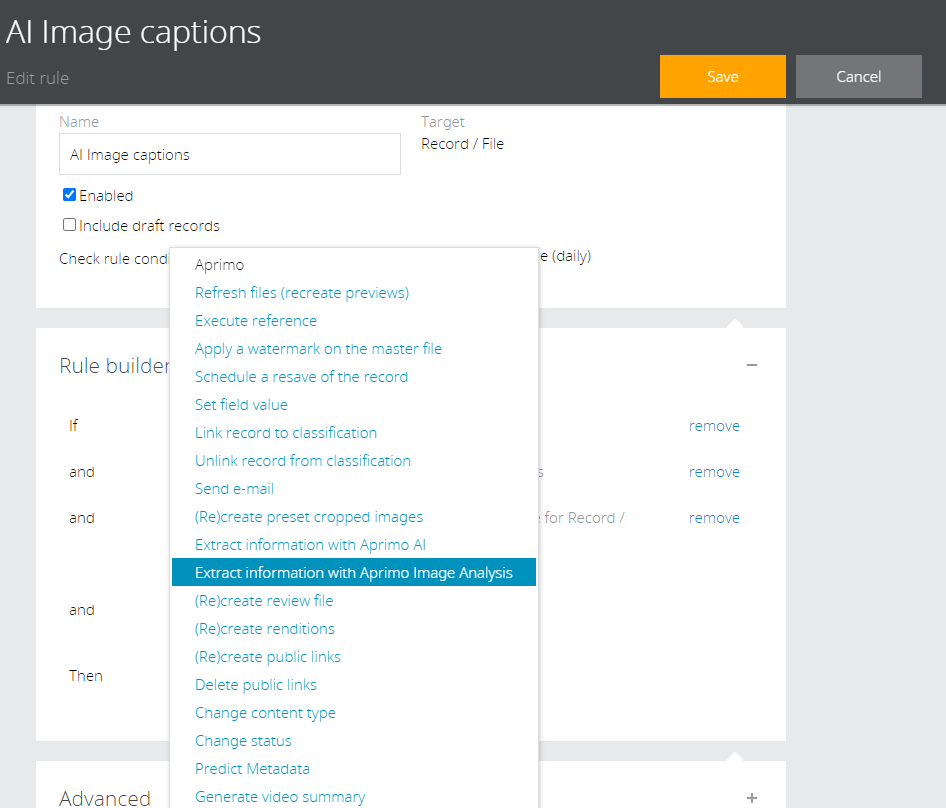
When this action is selected, it will show as 'Enhanced Captions'.
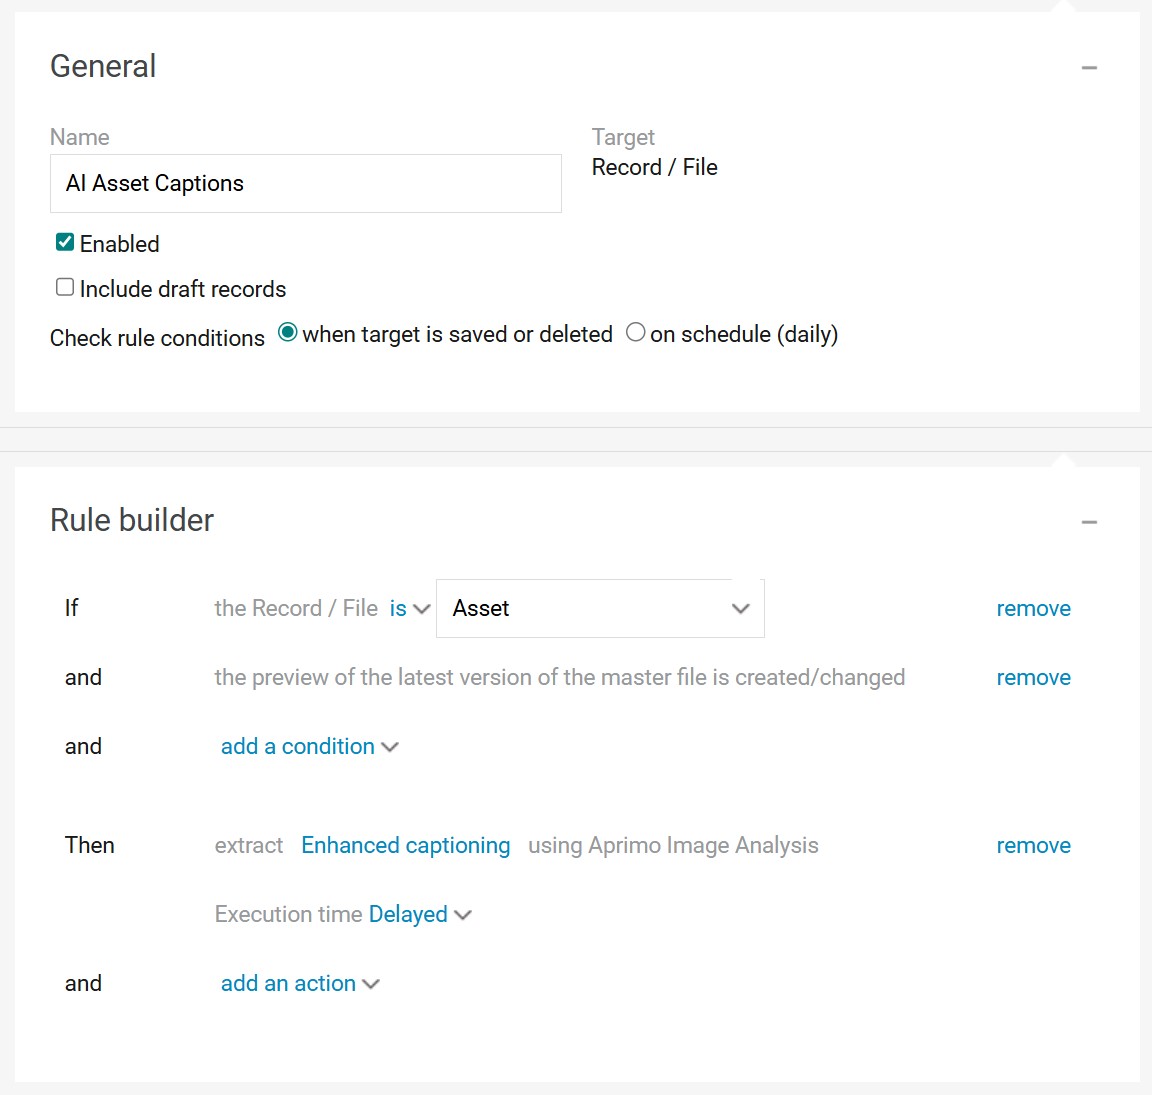
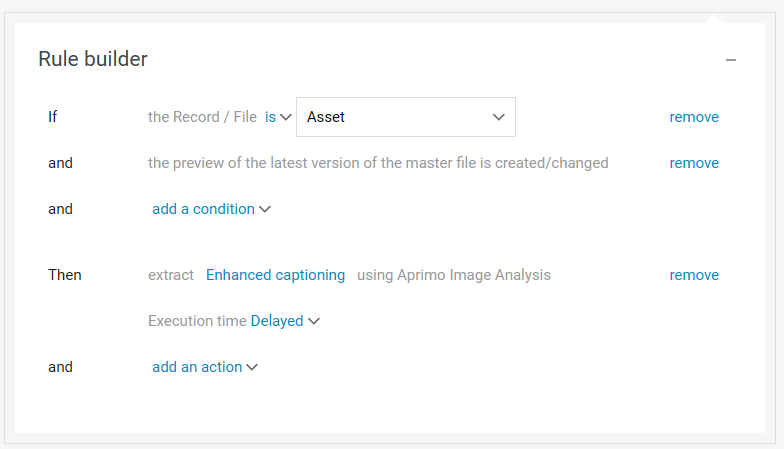
The image below shows a rule to generate enhanced captions for all ingested image content. It's important to carefully consider additional conditions, such as which image categories you want this rule to apply to, or the status the assets should have before enhanced captions are added. You can then adjust the rule conditions accordingly.
Test your configuration:
Upload a new image
In System > Advanced > Job Log, you can verify that your rule to generate enhanced captions (Rule Job) waits for the ingestion process to complete and the image preview to be generated (Record Job). See screenshot below.

Once the enhanced captioning rule job has completed you can check the enhanced captions on the item you uploaded in Content Workspace.
Note: If your asset versions require re-rendering of the enhanced captions for each version, you can modify the rule by omitting the condition that checks if the caption field is empty and replace the preview exists condition with "Master File preview created or changed". Additionally, you should add "On Master File Change" as an extra trigger to the "Reset to Default" condition on the caption field. These adjustments ensure that enhanced captions are generated for each version and remain visible in the DAM UI.
Activating enhanced captioning on documents.
Enhanced Captions on documents can be configured just like images. However, if you don’t want enhanced captions to be visible on the content item in the user interface, simply configure a rule. Once the rule generates the enhanced captions, users can benefit from them through search without seeing them directly on the content item.
In my environment, images are typed differently than documents (content type). Documents are ingested into the DAM as the 'Asset' content type. If your setup differs, you'll need to adjust the rule to correctly identify the documents it should apply to.
The conditions for the rule are basically the same as discussed above for the image captions:
1. Content Identification: Specify which content or content types need captions, focusing on image and/or document content types.
2. Master Preview Availability: Verify that the assets have a master preview available before generating captions.
In this instance we did not create a field to display on the content item, so an alternative condition is necessary to prevent captions from regenerating on every save. In this configuration captions are generated when the preview of the master file is created or changed.
You can test the setup in the same way as described for image content earlier in this section.
If you decide to display AI-generated captions for documents in the UI, make sure to use a larger multi-line text field compared to images. Document captions are typically 700-800 words and can exceed 5,000 characters, so they require more space.